Showing posts with label Crafts. Show all posts

Tuesday, 12 November 2013

Chanukkah Up-cycle


This past week I tackled my stemware Chanukkiah and I have to say I am more than  pleased with the outcome. This is really inexpensive to make because all thrift stores have an overwhelming amount of mismatching stemware for cheap!


To do this you need:
9 pieces of steamware
enamel/glass paint
make-up sponges
electricians tape


Use the electric tape to tape off stripes or other designs on your glasses. 

I started out measuring from the rim down to make sure I had the stripe straight but eventually found it easier [and just as effective] to pull the tape taunt and just "eye ball it" as I turned the glass. 

My paint was on the relatively thick side as well so I found it worked well to prime my sponge first by getting it wet and squeeze it out before dipping in the paint. This opened the pores of the sponge and helped thin the paint. 

Sponge over the area you want to paint until you're happy with the results and carefully peel back the tape.


Cut out shapes from a strip of tape and paint over them for this effect.


A word about glass paint...
Some paint requires baking for a period of time in a 350 degree oven...mine says bake or let dry 21 days. For this project I am opting for the air dry because I have no idea of the quality of the glass in question and whether it would be able to take the heat or not.I am planning on finishing all the glasses with my Krylon Crystal Clear acrylic sealer to further protect the paint finish, since no one is going to be drinking out of any of them that won't be a problem.


**I know in the finished photo I have the tea lights in the bottom of the glass but when it comes time to actually light them I plan on using some kind of filler(Epson salts, pebbles etc.) so they are not so far down inside the glass. This will prevent the unsightly black flame rings and keep the glass from getting to hot.

Thanks to www.creativejewishmom.com for giving me this idea http://www.creativejewishmom.com/2010/03/fit-for-royalty-paint-stunning-wine-glasses-for-pesach.html

Thursday, 22 November 2012

Two to One - Skirt transformation

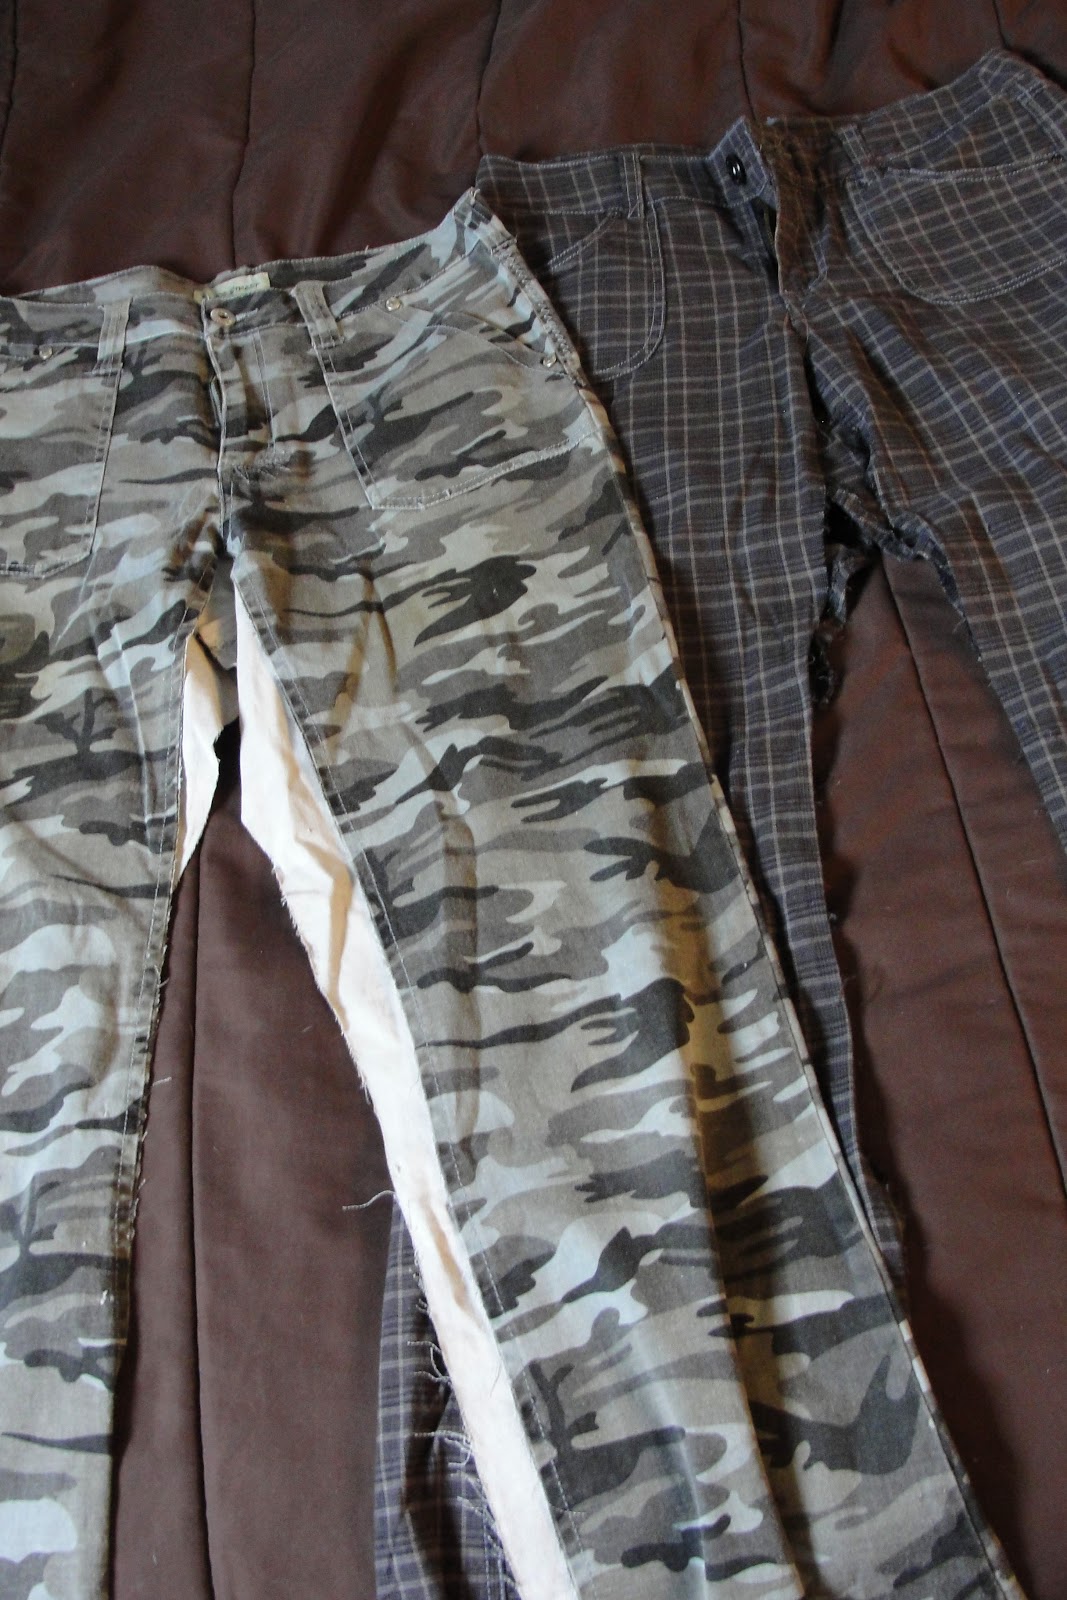
 So this was something that I had intended to post about a month ago when I finished this project but due to some things like packing and flying across the country it kinda got forgotten. I had these two pairs of pants kicking around for awhile. I knew I wanted to make a skirt out of them but I just haven't had the time. Well when I had the time off in October I finally did it. I spent around 3 hours trying to make a plan before getting frustrated at getting no where and just dove in and started cutting, sewing and making it up as I went along. I left most of the edges raw so they will eventually fray and make a rag effect...plus it's faster and easier to sew that way ha ha ;)
     Bada bing, bada boom and there you go. I also lined it, so it is actually nice and warm for fall, winter, or Canada, whatever climate you may be residing in.

Tuesday, 20 November 2012

Etz Chaim - Tree of Life

When it comes to art I have always reached for the pencil and sketch pad over a set of brushes and paints. Maybe because the commitment part of paint scared me too much. You can always erase pencil...and for someone who is notorious for making plenty of mistakes that was top priority. But not too long ago I started experimenting with the painting a bit more and I have to say, as nerve wracking as it still can be working with paint, I love being able to create a work "in colour"!


Sunday, 23 September 2012

Pomegranate Garland


I meant to have this post done before Rosh Hashanah but it got pretty busy but anyway here it is now, hopefully in enough time for Sukkot!

I always like to think of things I can make that are going to last from year to year and is less holiday specific.You can put these up for Rosh Hashanah and leave them up through Sukkot. Or even use them as Sukkah decorations.

They are not expensive to make they just require a little time and patience.

 What you will need
Paint brush
Package of small Styrofoam balls
thick thread or clear fishing line
glitter
a couple of pins and a sewing needle
white glue or Mod Podge*
thin paper such as tissue paper or crepe paper
beads of your choice

I wanted to be able to hang these in our sukkah later so I used Outdoor Mod Podge. It is much thicker than white glue and creates a nice finished seal. You should be able to find it at any craft store, I got mine at Michael's
Spear one of the balls with a pin and brush it all over with your glue mixture. Tear a small square of your paper, big enough to completely cover the ball but small enough you don't have a ton left over, and wrap it around the ball and smooth it down. Coat it again with the glue, holding the excess paper at the top with your pin. After doing the bottom spear your second pin into the opposite end of the pomegranate and carefully remove the first pin you inserted. You should have a little tuft of paper at the top that you haven't covered in glue yet. so glob on some glue and form it into a little bump on the top to make the stem. It helps to dip your fingers in a little water and smooth everything out.

Sprinkle with a little fine glitter and allow to dry on a plastic bag. You will probably want to rotate them once the top has dried. 

After they are completely dried you can start threading them into a garland. If you make a pile of them you can thread them on one after another. However after the finicky-ness I decided to thread fine beads on in between each one.

I would highly recommend using fishing line instead of thread though, just because it is going to be far more durable, especially if you plan to put it in your sukkah where it could get rained on.

Chag Sameach!
May it be His will that next year we will celebrate in Yerushalayim!

Thursday, 9 February 2012

THE TZADAKAH JAR


In keeping with the tradition of giving Tzadakah (charity) before lighting the Shabbat candles on Erev Shabbat (Shabbat eve = Friday night). I made this special Tzadakah jar. I picked out a nice glass jar from the recycling and first removed the sticky label goop with rubbing alcohol. I used a special ceramic/glass paint from Michaels's craft store (some ceramic paint you have to bake in the oven to cure but this kind was just the air dry version.

On facing sides I painted
 a tree, reminding us of the tree of life in the garden of Eden, Torah: being a tree of life, the righteous are liken to as a tree planted by a stream of water etc. Around the top I wrote the word "Tzadakah" both in hebrew and transliterated.

Before lighting the Shabbat candles everyone drops a few coins into the jar and we bless the L-rd for the mitzvah
"Blessed art thou, Lord our God, King of the universe, who sactifies us with Your commandments, and commanded us about the Tzedakah."
At the end of the year it is donated to a charity, traditionally one in Eretz Y'israel (the land of Israel).
NOTE **This is not meant to be the only charity given throughout the year.